
Last session we left the adventurers in media res in the now infamous trollkin-infested Dwarven Barracks. Here’s what happened next.
You can read earlier posts here. This post contains spoilers for Scarlet Citadel.
We didn’t have Farthrum’s player for this session which made things a bit tricky as we were in the middle of combat. Normally, if a player isn’t there, their character fades into the background, but this wouldn’t really have worked in this situation. Instead, I took over running him until the combat was over and then he vanished.
Low on hit points and almost out of spells, the adventurers decide their best course of action is to run away and live to fight another day. Unfortunately as they start to retreat, Farthrum is struck by the trollkin shaman Sassigne’s flaming sphere and falls unconsious.
The others withdraw to the stairs and get ready to turn undead as soon as the lich hounds appear. Both spectral hounds are turned and the characters are able to kill Sassigne, heal Farthrum, and escape back to Level 2 where Tunde casts a much-needed prayer of healing.
Desperate to catch their breath, the adventurers go into the clockwork scribes’ room to rest, but the two lich hounds have other ideas. They kill the first hound, but the second one bites Clairmont, pulls him down, and rips open his guts. Tunde finishes it off with eldritch blast but by this stage everyone is out of spells.
Now able to take a short rest, the characters spend their hit dice and recover some spells and abilities, then head back down the stairs. Two trollkin grunts shoot arrows at them, then flee into the new room. When a dire owlbear appears, the party run back up to Level 2.
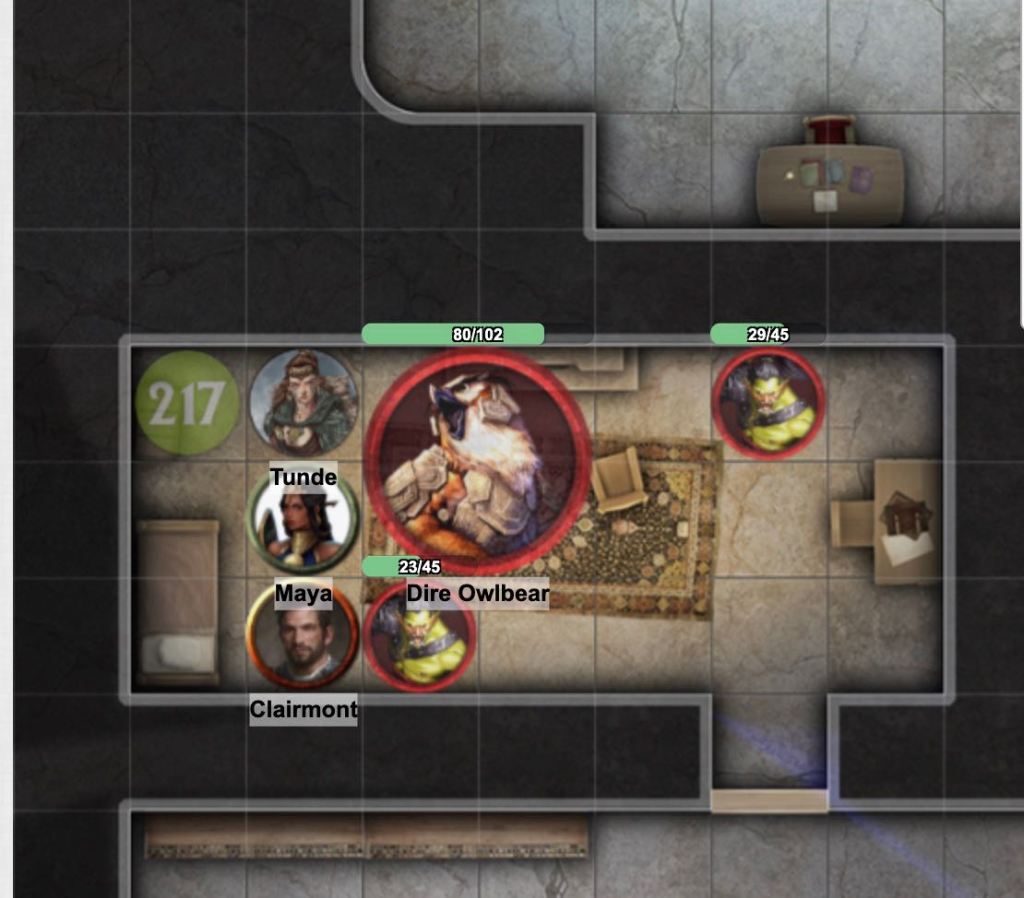
This time, they attempt to rest in Cagoth-Ze’s study and are attacked by a trio of trollkin grunts. They kill all three, then move to Cagoth-Ze’s chamber to see if that is safe to rest in. It isn’t. A dire owlbear crashes through the door, accompanied by two trollkin grunts. Fighting in the cramped quarters isn’t easy but the characters manage to kill the owlbear and one grunt; the second one flees.
Deciding to return to Redtower, they scurry past the ogrepede on Level 1 and make good their escape….
If you’d like to keep up to date with my Scarlet Citadel campaign and other posts, please do join my mailing list – there’s a sign up form on the home page and subscribers receive a free Parsantium supplement.
If you’ve already signed up and haven’t received a download link, please get in touch.
Main image by David Auden Nash
Discover more from Richard Green | Game Designer
Subscribe to get the latest posts sent to your email.

Dwarven Barracks has been one of my favorite sets of encounters. My group tends to be impulsive, yet successful. They got through the five creature encounters, including the Gauntlet with a fire elemental due to a crit fail on an eldritch blast. I left a dead dire owlbear to block them from moving down or into the main hall. They started being stealthy, but our barbarian decided to move into the main hall via the stockroom. I usually don’t unleash too much on these guys, but I did at this point(“Literally, did you really just do that?”). They are survivors, rolling a bunch of crits. We use Beyond, and this encounter had 24 turns per round to start. After 8 rounds they’re down to about 14(party of six).
I think at this point they understand the gravity of the Scarlet Citadel. They thought I was targeting them up to this point. We love this campaign.
LikeLiked by 1 person
Excellent stuff! My players are having a tough time but are slowly but surely whittling down the trollkin numbers!
LikeLike