Here’s the write up from our latest Tomb of Annihilation session, in which the characters continued exploring the ruined city of Omu in search of the nine puzzle cubes they need to enter the Tomb of the Nine Gods.
Begin here with Session 0 – Caves of the Cockatrice
29th Nightal, 1495 DR (contd.)
After fleeing from the clay gladiators, the adventurers have a short rest outside Shagambi’s shrine. Meanwhile, Nanna attempts to pry open the hatch in the top of the pedestal with a crowbar, unleashing a cloud of poison gas from holes in the relief carvings on the wall. She blocks up the holes and tries to open the hatch again without success.
Tyke and Buzzter, Tharhul’s two beast companions, are lying dead on the floor of the gladiatorial pit. Worried that the death curse might stop them from being brought back to life if they don’t act quickly, Tharhul strips off his armour so he can fit through the bars over the pit. Nanna rigs up a harness and Tharhul is lowered through the bars on a rope above the lifeless form of Buzzter. The minotaur touches the giant wasp and expends a spell slot to restore him to life. Once Buzzter has flown to safety, Tharhul is lowered down again so he can bring back Tyke. The velociraptor makes a run for the passage but stepping on the floor of the pit activates the remaining three clay gladiators who pursue Tyke to the floor above. This time, the characters are able to defeat the warriors. They insert the four bronze spears into the hands of the statues in the shrine and retrieve Shagambi’s puzzle cube.
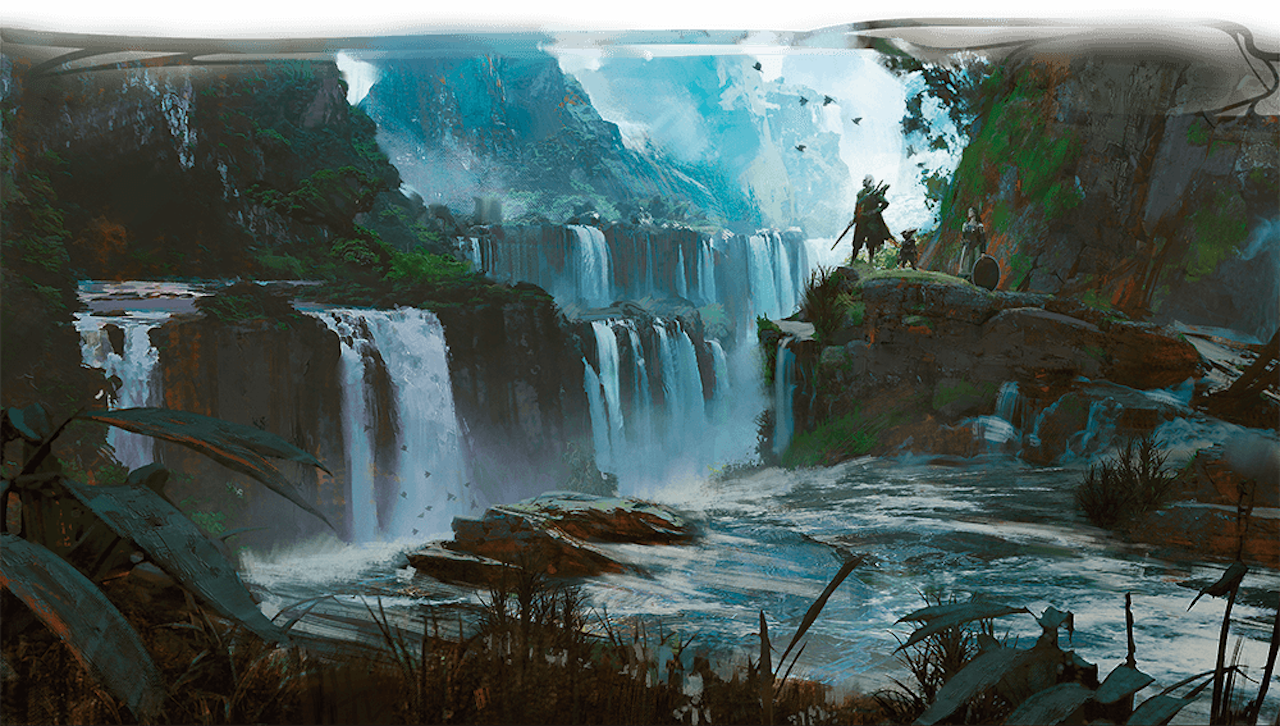
Heading north from the shrine, the characters are on the lookout for the Red Wizards. Eysleigh spots one of the mages and four bodyguards walking through the ruins on the other side of the river. At the same time, Nanna notices a group of vegepygmies standing at the edge of the volcanic rift, apparently about to throw a bound captive into the lava. Deciding that the latter situation is more pressing, the adventurers approach the vegepygmies who are performing a strange ritual dance. Eysleigh summons the Green so he can speak with plants and tries to reason with the little creatures. Meanwhile Nanna uses her whip to grab hold of the grung prisoner so she can pull her away from the edge. When the vegepygmy chief refuses to stop the ritual, Eysleigh casts plant growth as a demonstration of his druidic power. The impressive foliage distracts the vegepygmies, allowing Tharhul to grab the grung and make a run for it.
Orvex the Thayan scribe speaks Grung and learns that the rescued grung is named Imbok, one hundred and eightieth son of the grung chieftain Yorb. If the characters escort him safely to his father’s shrine in the northeastern part of the city, they will be showered with gold!
The party must cross the raging river to reach the place where they saw the Red Wizard and Yorb’s shrine. They decide to rope themselves together before crossing the large fallen tree forming a bridge over the water. As they cross, they are peppered with poisoned arrows fired by aged tabaxi hunter Bag of Nails.
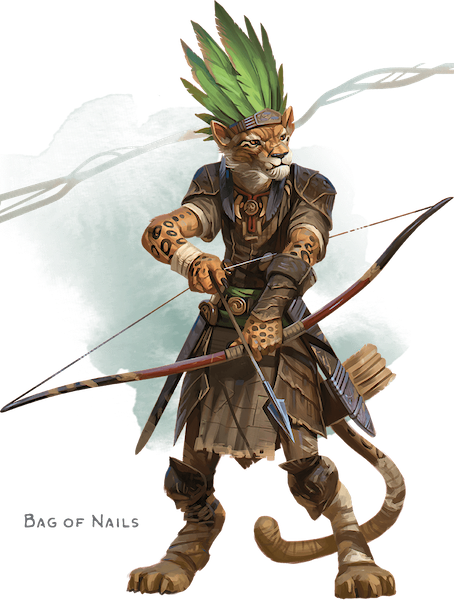
Rhamash cuts himself free and is first across the tree to confront the archer, while Tharhul, Certes, and Nanna return fire. Bag of Nails surrenders and apologises for shooting at them. He explains that now he is in his twilight years, the Cat Lord has brought him to Omu to hunt dinosaurs and other jungle beasts so he might die a hunter’s death. When the characters ask Bag of Nails to make amends by tracking the Red Wizards, the tabaxi points them in the direction of another shrine.
Approaching cautiously, the characters observe the Red Wizard and his bodyguards entering the small building outside, before pushing open the doors to the shrine itself. Sounds of fighting soon emerge from inside. Certes casts invisibility and sneaks up to the entrance so he can peer in. Inside, the mage and his guards are battling a trio of ghasts beneath a large statue of Unkh the flail snail. Meanwhile, the others take up positions outside and wait for the fighting to be over.
When the battle is done, all three ghasts and two Thayvian warriors lie dead. The Red Wizard tries one of the six keys hanging niches in the walls in the keyhole of the pedestal. This triggers a trap: the flail snail statue’s shell emits dazzling rays of light in all directions, killing the two surviving warriors. Eysleigh casts barkskin on Certes and the wizard turns himself into a giant ape, then attacks. Rhamash, Tharhul, and Tyke rush in to help and are blasted with a cone of cold. The Red Wizard misty steps outside but is shot dead by Nanna.
The gnome examines the six keys, then sends everyone into the small building to look for other keys that are the same size and shape. After puzzling over the keys for a while, she realises that one key has teeth that match the combined teeth of the six keys found in the shrine. She put this key into the keyhole, turns it, and retrieves Unkh’s puzzle cube.
To cover their tracks, the characters drag the bodies of the Thayvians and ghasts to the volcanic rift and throw them in. They put the six keys back in their niches and take the key that unlocks the pedestal with them. Once they’ve done this, they follow Bag of Nails to his lair, a basement beneath a ruined building.
There, the tabaxi gives them bowls of warming stew. While they have a short rest, he tells them of his quest to find the Navel of the Moon. Said to be carved from a chunk of the moon, this polished egg-shaped stone was given as a gift by the ruling syl-pasha of Calimport to his sailor daughter. It is said that anyone who holds the stone can always find the way home to his or her loved ones. Bag of Nails hoped to use the stone to find his missing son but has failed to find the artifact.
If you’d like to keep up to date with my Tomb of Annihilation campaign and other posts, please do join my mailing list – there’s a sign up form below and subscribers receive a free Parsantium supplement.
Discover more from Richard Green | Game Designer
Subscribe to get the latest posts sent to your email.
